
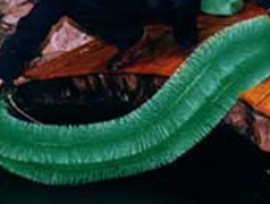
Spawning Brushes Stockist
Price range: £18.47 through £73.88
PACK OF 2 (59″ x 5.5″)
Additional information
| Brush Pack | 1 Single Brush, Pack Of 4 Brushes |
|---|
Why do I need?
If you have mature koi of each gender, they will be ready to spawn at any time from April to August. The earliest they will spawn is temperature and daylight dependent and so a warm spring will bring the season forward and cold weather will delay it. Koi look for some where suitable to lay their eggs. In nature this will be plants, roots and filamentous algae. Since most domestic koi ponds are devoid or short of these, either the koi will not spawn at all or they will try to spawn on the walls of the pond. The very act of spawning is extremely energetic and so the fish are at risk of damaging themselves on the hard edges of the pond if they have nothing more suitable on which to spawn.
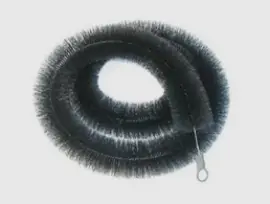
Black knight spawning brushes are designed to be harmless to the fish (they are soft and smooth) and to emulate plants. Simply placing the brushes appropriately in the pond will provide a focal point for the fish that is out of harm’s way and will dramatically reduce the chances that the fish will injure themselves on the side of the pond.
How does it work?
Our spawning brushes need no preparation before use. They can be suspended on the pond in the most suitable position to encourage the fish to spawn on them.
When the mature female is ready, she will give off pheromones which will trigger activity amongst the males. You will probably first notice something happening during the evening. Perhaps two to four males will start showing a greater interest in the female and will start following her more closely. This will be relatively low-key activity for several hours.
Koi always start spawning early in the morning and the process can take several hours. It starts with an escalation in activity and the males will be harrying the female and almost pushing her around. As soon as she is ready, she will be ready to release her eggs and the process will begin.
Cyprinids (members of the carp family) do not lay their eggs all in one go and in one place. The female will shoot forwards at high speed across the spawning brushes and squirt a few eggs each time onto them. The eggs are coated in a sticky substance that makes the eggs adhere to the brushes. During each bombing run (when you see it, you will understand why we are describing it in this way), the males will follow immediately behind the female and will spray their milt over the eggs to fertilise them. This process will be repeated many times. A small female may do it 40 times and a very large one may do it 150 times.
The eggs will remain stuck to the brushes although you may not be able to see them. You can lift the brushes out of the water briefly to have a look. They are translucent and look like tiny spheres of jelly.
You can leave the brushes in the pond if you wish for incubation and hatching. If you want to maximize the number of fry that hatch then it is better to remove the brushes to another oxygenated and filtered tank or pond away from the other fish. Mature fish will eat many eggs and fry if you let nature take its course in the pond. If you wish to move the fish, ensure that you equalize water temperatures first because a temperature shock will reduce the success rate.
Fertilised eggs will show a couple of black spots (the eyes) after two or three days. All unviable eggs will turn white in a day or two. The dead eggs will attract fungus which can be minimized by adding some malachite green to the water.
In high temperatures, the eggs can hatch in about 3 ½ days and in up to 8 days in cool temperatures. Typically, a period around 5 days is average and this should be achieved at around
18 – 21 deg C. The fry will hatch and then stick to any nearby object and wait there for a further day while they digest the remainder of their yolk sac. When the yolk runs out they will swim to the surface to take a gulp of air to inflate their swimbladder for the first time. From this point on they are free swimming and will be looking for food.
A few hours after the fry start to hatch, you should remove the brushes so that the remaining dead eggs do not pollute the water.
Koi fry can be difficult to feed artificially for the first two weeks. In nature they would feed on zooplankton. These are tiny animals that live in suspension in the water (such as daphnia) and are an ideal first meal for the fry. You can make your own zooplankton by hatching brine shrimp. You can buy freeze-dried brine shrimp eggs; you place them in oxygenated warm salt water and they hatch in 1 day. It is quite a simple process and is ideal for feeding the small fry.
You can buy dry fry food from your local aquarist. This is fine for fry that are a week old but it is a little tricky to get newly hatched fry to start on it.
One very important point is to monitor the water quality of your hatching tanks. It is essential that you have good mechanical and biological filtration if you are to raise your young fish successfully.
How to use
Place the brushes below the water level, one above the other slightly away from the edge of the pond. You can secure them in position by tying strings to the loops at the ends of the brushes.
When you put the brushes in the water for the first time they will try to float. This is because of microbubbles sticking to the brush filaments. Give the brushes a little shake under water; this will release the bubbles and the brushes will settle at the right height just below the surface.
Maintenance
When you have finished using the brushes, hose them down until they are clean. When the brushes are dry you can store them for re-use next season.
Related products
-
Vortex Brushes Stockist
Price range: £13.92 through £69.60Select options This product has multiple variants. The options may be chosen on the product page -
-
Filter Brushes Stockist
Price range: £1.88 through £6.35Select options This product has multiple variants. The options may be chosen on the product page